On-field Sports Injury Assessment and management
- Primary survey (DR ABCDE Protocol)
- Transfer the athlete from the FOP to the fieldside
- Secondary survey (Fieldside evaluation)
- Management plan
- Return to play criteria
- Documentation of Injury
1. PRIMARY SURVEY
Driscoll et al. (2004) identified that the aim of this survey is to assess whether the injured athlete can be categorized as 'primary survey positive', i.e. do they have an immediate life-threatening condition? This vital survey should take a maximum of 30 seconds to ensure quick delivery of immediate care. Driscoll et al. (2004) identify a criterion with which exclusion from this category can be made, and immediate resuscitation identified as unnecessary.
The criteria presented are as follows:- The athlete can talk;
- They are fully alert;
- Their respiratory rate is between 10 and 29 breaths per minute;
- Their pulse is between 50 and 120 beats per minute;
- The athlete is not cold, clammy or sweaty.
- D - Danger
- R - Response
- A - Airway
- B - Breathing
- C - Circulation
- D - Disability
- E - Exposure & environment
DANGER
A quick scene survey is performed, assessing the situation of the incident and any potential additional dangers to the therapist or the athlete. The sports therapist should remember the use of protective barriers and safety when entering the field of play.
RESPONSE
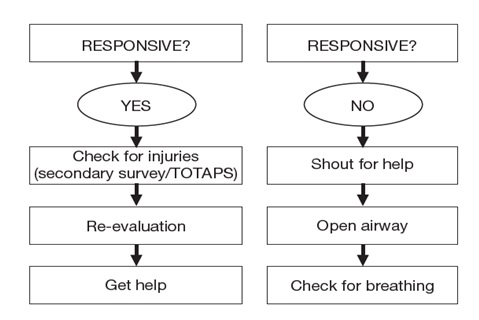
The type of response given by an injured athlete can give information on their condition. If on reaching an injured athlete they are found to be alert and conversing normally, then it is known that the athlete will have an airway, will be breathing and will have a pulse. Here, a secondary survey can be undertaken using the 'TOTAPS' protocol.
If the patient is conscious and appears to be choking - follow the Choking algorithm. If there is no response from the athlete, therapist should try to get response by call him loudly and clearly, tap on shoulder, pinching earlobes. After these procedures, therapist should start assessment from airway if there is no response.
AIRWAY
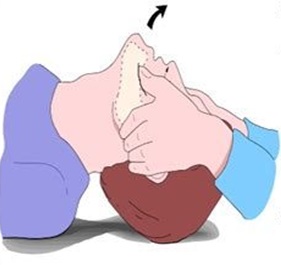
The sports therapist assesses for any evidence of airway obstruction. If the patient is unconscious, not breathing or not breathing adequately remove any mouth guard, perform a head tilt/chin lift or jaw thrust maneuver and observe if normal breathing returns. Should the mouth be full of vomitus, perform oral suctioning with a portable suctioning device and a large bore rigid suction catheter or make athlete to lie on lateral recumbent position and remove obstructions from the mouth.
The injured athlete may display any of the following signs and symptoms:- Noisy breathing
- Stridor (high pitched wheezing)
- Altered respiratory pattern.
- Head tilt and chin lift
- Jaw thrust
- Remove obstructions using finger scoop method.
- Check for the effectiveness of the airway intervention by looking for symmetrical chest movements, listening, and feeling over the mouth for air movement.
BREATHING
Once it has been established that the airway is patent , check for air movement by observing symmetrical chest movements, listening for breath sounds over the patient's mouth, and feeling for expired air on the cheek. the sports therapist should kneel to the side of the athlete and turn their head to face the athlete's feet; while placing their ear above the athlete's mouth, the therapist should look, listen and feel for normal breathing. This assessment should take no more than ten seconds. If breath sounds are absent in the unconscious patient, then initiate CPR immediately.
CIRCULATION
When assessing the circulation of the injured athlete, the sports therapist should consider a number of factors:
- Evidence of bleeding
- Hematemesis (vomiting of blood)
- Bleeding from nose or ear
- Internal bleed
- Evidence of shock
- Tachycardia
- Tachypnea
- Reduced capillary refill time
Therapist should check evidence of acute coronary syndrome or heart failure. Therapist should check pulse through carotid artery and also radial artery. Normal pulse rates for adults range between 60 and 80 beats per minute (bpm), and children from 80 to 100 bpm. However, athletes generally have low pulse rate than normal populations.
DISABILITY
A basic neurological assessment process can be made using the 'AVPU' mnemonic
- A - Alert - Is the injured athlete alert?
- V - Verbal - Do they respond to verbal stimuli?
- P - Pain - Do they respond to a pain stimulus (for example, a squeeze or pinch of their upper trapezius)?
- U - Unresponsive - Are they unresponsive to all of the previous stimuli?
More detailed assessment of level of conscious using GCS scale can be taken in suitable environment during secondary survey.
EXPOSE AND ENVIRONMENT
'E' is used to denote exposure, a reminder to the examiner to expose the patient in order to examine for otherwise unseen serious wounds, fracture deformities, or even petechia.
In some countries, 'E' is used to denote an environmental evaluation concept to remind the examiner to do the following:
- Expose the casualty.
- Exclude hypothermia as a cause of cardiac arrest.
- To consider hypoglycemia as the cause of coma or convulsions.
Once the 'E' evaluation has been completed, initiate patient immobilization and transfer from the FoP.
2. TRANSFERRING THE ATHLETE FROM THE FOP TO THE FIELDSIDE
Perform any necessary life-saving treatment on the FoP. If the patient is stable, then secure and immobilize the patient before transporting to the fieldside, athlete medical room, or ambulance for further assessment or treatment. If a spinal injury is suspected, then extra attention must be given to spinal immobilization. In a serious injury, the athlete may need to be immobilized and transferred on a backboard, vacuum mattress, or in a basket but on most occasions, the athlete will self-extricate and walk assisted or unassisted, to the fieldside.
3.SECONDARY SURVEY (FIELDSIDE EVALUATION)
The fieldside evaluation includes the following:
- A repeat of the primary survey
- Establishing basic monitoring and recording of vital signs
- Conduct a secondary survey (this should take no longer than 2-3 mins)
- TOTAPS / HOPS / SAMPLE
- Conduct a focused examination in the less seriously injured athletes
- Talk
- Ask the player
- What happened?
- Where does it hurt?
- What kind of pain is it?
- Observe
- Look at the affected area for signs of injury and compared with opposite side
- Redness
- Swelling
- Other abnormalities
- Touch
- Gently feel for swelling/deformity
- Try to pin point the pain
- Active movements
- Ask the player to move the injured part without assistance
- Passive movements
- If the player is able to move the injured part, attempt to the injured area through full ROM
- Skill test
- If none of the above procedures has resulted in pain, the player should stand and show they have ability to perform the game's skill.
- If injury is identified, the player should be removed from the activity and treated.
- History
- Observation
- Palpation
- Special test or stress test
4. MANAGEMENT PLAN
AIRWAY MANAGEMENT
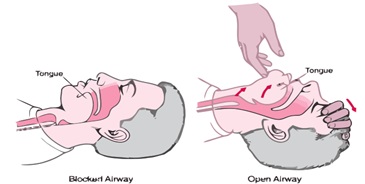
Head tilt and chin lift maneuver
- Heal tilt stretches ant neck muscles and lifts tongue away from the posterior pharyngeal wall.
- chin lift method pulls mandiple and tongue forward.
- In neck injury patients, head tilt is not a preferred method. It further increase the damages to the spinal cord.
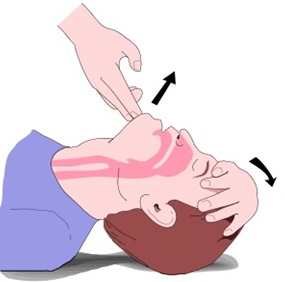
Jaw thrust maneuver
- An alternative method for head tilt and chin lift method.
- Technique of choice where cervical injury is suspected.
- Place the fingers posterior to the mandible of jaw and apply upward and forward pressure.
- Hold the mouth slightly open using thumbs to displace chin inferiorly.
BREATHING MANAGEMENT
- Maintain oxygen saturation by administering high-flow (15 L/min) 100% oxygen via a non-rebreathing or trauma mask (masks with reservoirs ensure a higher concentration of supplemental oxygen).
- Titrate the inspired O2 to a saturation between 94% and 98%.
- If the patient is dyspneic and no pulse oximeter is available, administer 100% oxygen.
CIRCULATION MANAGENT
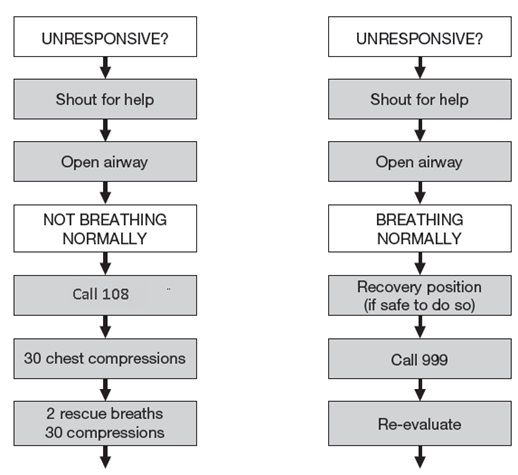
- If pulse is present, put the patient into recovery position and monitor.
- If pulse is absent (or when in doubt), initiate chest compression followed by rescue breaths.
- CPR involves giving alternate chest compressions and breaths: the ratio being 30:2.
- During chest compressions, do not worry if ‘crack a few ribs’; a few broken ribs won’t do much harm.
- Breaths should be forceful enough to make the chest rise up; do not go for the second breath till you see the chest deflate completely.
- After every couple of minutes, check for recovery; if patient is still not breathing, continue with CPR.
CPR MANUEVER
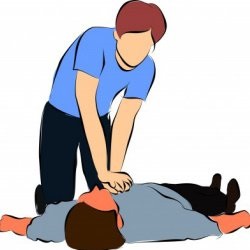
- CALL. Check the victim for unresponsiveness. Shake and shout to see if the victim is unconscious. If there is no response, call 108 and return to the victim. In most locations, the emergency dispatcher can assist by giving instructions for CPR.
- BLOW. Tilt the victim’s head back and look, listen, and feel for breathing. If breaths cannot be heard, felt, or observed by watching for movement of the chest, begin rescue breathing. If the victim is not breathing normally, pinch the nose and cover the mouth with your own. Blow until chest rise is observed. Give two breaths. Each breath should take about one second.
- PUMP. Check for signs of circulation such as breathing, coughing, and movement. If the victim is still not breathing, coughing, or moving, begin chest compressions. Push the chest down about 2 inches, right between the nipples, 30 times. Push hard and push fast. Pump at the rate of about 100 compressions per minute.
HEAMORRHAGIC MANAGEMENT
EXTERNAL BLEEDING
- Direct pressure on the bleeding site is the standard treatment for all bleeding wounds.
- On the FoP, use clean (bottled) water to flush the wound of mud or debris.
- This cleansing method has been proven to be safe and efficient. Flush the wound with copious amounts of water if the wound is contaminated and use clean gauze to wipe the dirt and debris from the surface of the wound.
- To stop the bleeding, put sterile gauze on the wound and apply direct pressure
- Do not disturb any blood clot that has formed by exploring the open wound or removing the gauze to check if the bleeding has stopped.
- Apply a bandage to secure the gauze over the wound; the bandage should be tight enough to stop the bleeding but not so tight that it stops distal circulation if the bandage is around a limb.
- It is important to monitor the distal circulation intermittently after applying the bandage by checking the color of the limb, capillary refilling time (CRT), and distal pulses.
- On some occasions, consider using an arterial tourniquet to stop the bleeding.
- If bleeding continues and is visible through the dressing and bandages, do not remove the dressings and bandages. If necessary, place more gauze over the established wound dressing to hold it in place or wrap the wound with additional bandages or cling film.
INTERNAL BLEEDING
- Sources of internal bleeding include the liver, spleen, and kidney in the abdomen, or from pelvic or long bone fractures.
- Liters of blood can be lost into the body cavities resulting in the symptoms and signs of shock.
- If internal bleeding is suspected, provide high-flow oxygen through a non-rebreathing facemask and titrate the inspired oxygen to a saturation level between 94 - 98%.
- Establish full cardiovascular monitoring and intravenous (IV) access.
- In major pelvic fractures, gently rotate both legs internally and then strap them together with a bandage to reduce the potential space inside the pelvis and thus pelvic volume.
- A commercially available pelvic splint, a triangular bandage, or a simple bed sheet can be used to wrap around the pelvis to bind and stabilize the unstable pelvis on the FoP
SOFT TISSUE INJURY MANAGEMENT
PRICE Protocol
- Protection
- Rest
- Ice
- Compression
- Elevation
5. RETURN-TO-PLAY CRITERIA
FULL STRENGH
Proper rehabilitation is needed because all muscles supporting the injury must be at 100 percent of pre-injury strength prior to return to play.
FREE FROM PAIN
True pain is an indication that an injury has not completely healed. An athlete meets this criterion if there is no pain during the return-to-play performance tests.
SKILL PERFORMANCE TEST
Performance tests should begin at a low level of intensity and gradually increase until the athlete is performing at game speed. If at any time the athlete is not able to perform one of the tests, she is not ready to return to the sport.
Tests may include sprinting, jumping, cutting, backpedaling, pushing (football), and so on.
EMOTIONAL READINESS
It is always important to ask the athlete if he or she is ready to return. An athlete who is hesitant or does not feel ready should not be allowed to return.
6. DOCUMENTATION OF INJURIES
- Documenting athletic injuries is important for many reasons. Perhaps the most important reason is for follow-up care. Injuries require immediate care and recognition, as well as a plan to completely heal and rehabilitate the athlete.
- There are many different types of formats for reporting injuries. Many training facilities use the following
- SOAP notes
- Daily sideline injury reports
- Training-room treatment logs
- Daily red-cross lists
- Athlete medical referral forms
- DAVID MCDONAGH & DAVID ZIDEMAN. (2015) The IOC Manual of Emergency Sports Medicine, Wiley Blackwell.
- Keith Ward. (2016) Routledge Handbook of Sports Therapy, Injury Assessment and Rehabilitation.
- Robert C. France. (2004) Introduction to Sports Medicine and Athletic Training, Second Edition.
- David J Magee. Orthopedic Physical Assessment.
- Roald Bahr, MD Phd. The IOC Manual of Sports injuries.
- Elizebeth H. Oakes. The Encyclopedia of Sports Medicine.
| Name | : | Deva senathipathi |
| Qualifications | : | Physiotherapist |


